Previously….
My previous post shows how I got life from my ESP8266 here: https://petestechprojects.wordpress.com/2014/11/30/esp8266-4-wifi-module-bring-up/
Once I got life and updated to latest firmware, I changed my baud rate to 9600 by giving “AT+CIOBAUD=9600”.
Connecting to my Wifi AP
- Set my mode to “AT+CWMODE=3” to allow for both client and server mode (at least that is what I think it is).
- Scan for access points with AT+CWLAP command.
- Join the AP by sending AT+CWJAP=”[YourNetwork]”,”[YourPassword]”
- I used an AP with WEP encryption and it worked for me.
- I used an AP with WPA encryption and it doesn’t work for me. Need to debug later.
- Check that you get IP assignment from the router with AT+CIFSR
- I got to IP’s, 192.168.4.1 and 192.168.0.128.
- The first one (192.168.4.1) is the IP of the AP that the ESP8266 when operating as an AP (remember I set to CWMODE=3 in step one). Not sure how to use it yet.
- The second one (192.168.0.128) is the one my Dlink AP assigned to the ESP8266. This is the one I know how to use for now.
Here is a log capture of my TeraTerm window.
AT+CWMODE=3
OK
AT+CWLAP
+CWLAP:(4,”HOME-2372″,-93,”14:ab:f0:09:23:70″,1)
+CWLAP:(0,”xfinitywifi”,-94,”16:ab:f0:09:23:70″,1)
+CWLAP:(2,”OfficeWireless”,-49,”06:26:5a:b8:c3:e3″,11)
+CWLAP:(4,”SureWest-1C”,-87,”6c:b0:ce:e8:a5:1c”,6)
+CWLAP:(2,”n_Network”,-49,”00:26:5a:b8:c3:e3″,11)
+CWLAP:(1,”PetesPrivateNetwork”,-49,”0a:26:5a:b8:c3:e3″,11)
+CWLAP:(3,”Home Network”,-86,”74:44:01:93:84:78″,10)
+CWLAP:(2,”n_Network”,-58,”bc:ae:c5:b0:e1:f4″,11)
OK
AT+CWJAP=”PetesPrivateNetwork”,”xxxxxxxxxxx”)
OK
AT+CIFSR
192.168.4.1
192.168.0.128
OK
Setting up the ESP8266 as a server on Wifi network.
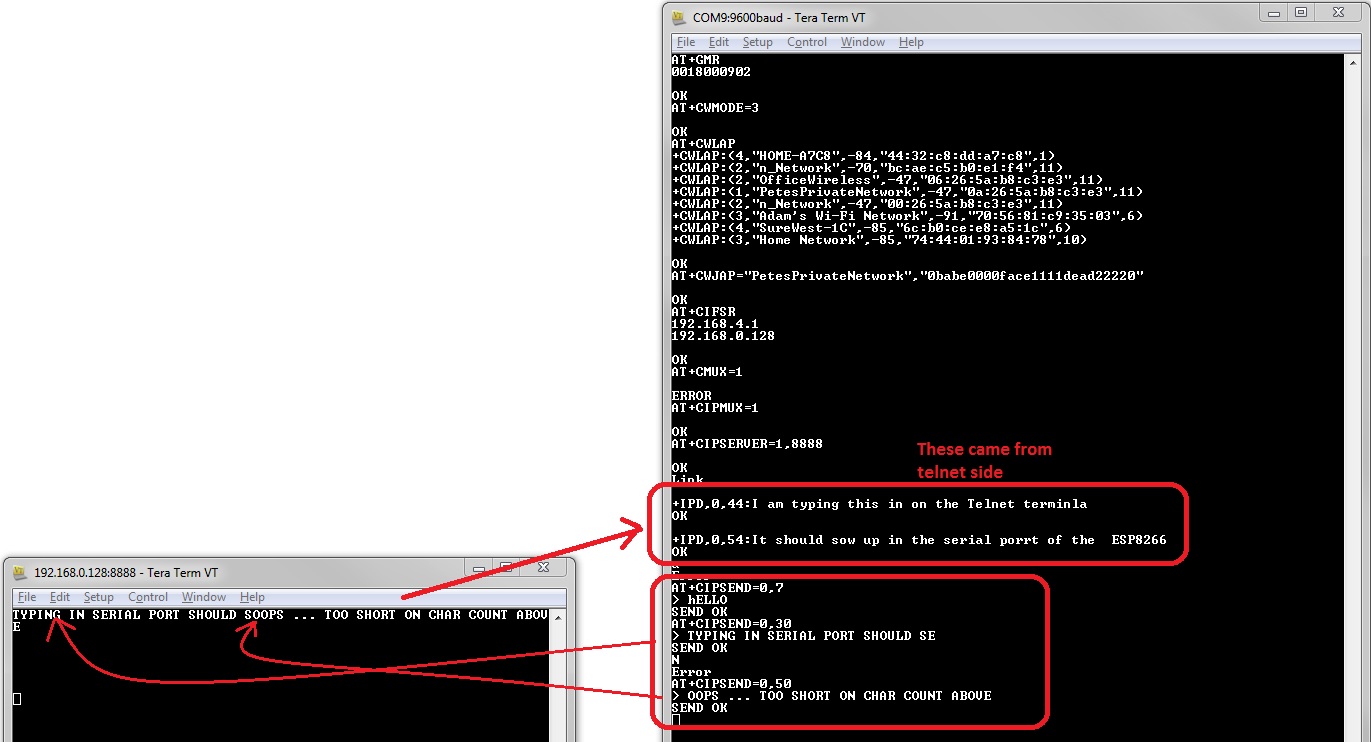
Now that I have the ESP8266 connected to my Dlink Wifi router, I want to communicate through it. I found that I can use a simple Telnet client to talk to the ESP8266 after setting up the ESP8266 as a server.
Need for CIPMUX first
I spent a long time trying to determine why I couldn’t initiate the server on the ESP8966. Googl’ing and stumbled on that the CIPMUX mode needed to be set first. I used AT+CIPMUX=1 for multiple connections. (I had problems later with with sending out data with mode 0 which is single connections.)
Starting and connecting to the Server
To start the server at port 8888…. AT+CIPSERVER=1,8888. (Remember the IP address is found above when I gave the AT+CIFSR command.)
Once the server is started, I opened a Telnet window from TeraTerm like this….

Whala… I get “Link” out of the ESP8266 serial port.
Sending strings back and forth
Typing in the telnet window and hitting carriage return will send the string through Wifi -> ESP8266 -> Serial pins on 8266 -> FTDI cable -> TeraTerm on serial port at 9600 baud. You should get something like this….
+IPD,0,44:asdkdsflljlasdhf
The 0 in the above string that shows up in the serial port is the channel. If you have multiple clients hook up to it, this is how you tell who is “talking”. This is also how you send back strings using the AT+CIPSEND command. For example, if you want to send back “what was that?” to the client that send the jumble above…
In your serail port window, send AT+CIPSEND=0,16
This will bring up a “>” prompt. The ESP8266 is waiting to send 16 characters. Now type in “what was that?” and it should magically -> FTDI cable -> ESP8266 -> Wifi ->Telenet window.
Here is a screen shot of the full exchange (click on image so you can read the text)…
I installed a simple Telnet App on my Android tablet and could do exchanges to my ESP8266 from across the house. Yupiieeee!!!!

Pingback: LED’s Control through TTY | PetesTechProjects
Pingback: Mini Server on Arduino + ESP8266 | PetesTechProjects
You don’t happen to know if the ESP8266 can be used as a Wifi repeater in CWMODE=3 by any chance?
LikeLike
I haven’t tried using the ESP8266 as a Wifi repeater. The only thing I have tried is to use the ESP8266 as access point in CWMODE=3. I could directly connect my Android tablet or phone to that ESP8266 (without using a Wifi router) and send and receive data to the connected Arduino.
If it were possible, I would think you would still need to have some code on the Arduino that would echo data from one channel to the other. Interesting idea but from my experience with the ESP8266 so far, I think there would be a lot of stability issues since I am seeing a lot of ESP8266 resets when just trying to implement a very simple web server on the Arduino.
LikeLike
Hello Peter,
Thank you for this post. By following your description I could easily get the same reaction as you “I installed a simple Telnet App on my Android tablet and could do exchanges to my ESP8266 from across the house. Yupiieeee!!!!”.
With kind regards,
Wim Dossche
LikeLike
Wim,
Glad you got it to work too. Check out the later post for more fun things that can be done with the ESP8266.
Thanks,
Peter
LikeLike
It all works, but can I use the telnet strings in my arduino code?
for example I want if i send ‘x’ to the ESP8266, I want to turn a led on.
(serial.read does’nt work when using ESP8266)
Please tell we how this would be possible.
Thanks in advance.
LikeLike
Casper,
In my later posts, I am doing a lot more complicated serial communication controls. I have a routine that does use serial.read to read 1 character at a time and builds a string until reaching the CR/LF.
Take a look at my post “LED’s Control through TTY“. My entire Arduino code is there. I read for key words from a TTY client and turn on LED’s when specific keywords are found. That should get you a good start.
Good Luck,
Peter
LikeLike
Hi Peter .
Very good post . I learn a lot from your posts.
have some thing not understand :
The esp8266 setup server Ip adress is 192.168.4.1 or 192.168.0.128 ?
is the AP and Server ip adress here same ?
Thanks
zq
LikeLike
zq,
The ESP8266 can connect to a Wifi router (client mode) and operate as a Wifi access point simultaneously.
192.168.4.1 is the IP address if you are connecting to the ESP8266 Wifi AP. You can use a client device to join the ESP8266 Wifi AP and then communicate to it at 192.168.4.1. You don’t need to have any other Wifi AP or Wifi router this way.
192.168.0.128 is the IP address that the ESP8266 was given by the router that I connected to (ESP8266 acting as client). That address will change depending on the router. If you have another device connected to the same Wifi router as the ESP8266 joined, you use the 192.168.0.128 address to communicate with the ESP8266.
Hope that helps clarify.
Regards,
Peter
LikeLike
hey thanks for the post great post.
Can I establish communication between 2 esp’s by setting mode 3.
Also can i change ssid and password of each chip.?
If yes then how.
please leave a reply.
LikeLike
Ashwini,
I don’t recall where I found the original AT command list, but here is one that came up near the top of a Google search for “ESP8266 AT Commands”…. http://wiki.iteadstudio.com/ESP8266_Serial_WIFI_Module. There you will find the command to set the SSID and password by using “AT+ CWSAP”. The table in the link should give you the details to set your SSID, password and some other parameters if you would like.
I have not tried using 2 esp’s to communicate between each other, but I don’t see a reason why that wouldn’t work as long as you set up one to be the AP and the other connects up to it as a client. I would think you would just need to
I didn’t test it but think that should work.
Good Luck,
Peter
LikeLike
thanks peter.
I got it. I tried it in nodemcu firmware and it works properly.
Hav u work with modemcu. I want to sort the string in lua.
i need proper syntax. If you know it or if u can try it please leave a reply.
Thank u so much again….
LikeLike
Sorry don’t have any experience with modemcu.
LikeLike